
Tutorial #1 How the Race Works
|
|
This short video provides a general overview of the Storm race format, and what you can expect to see on Race Day.
|
Tutorial #2 Race Maps & Instructions
click images to enlarge
|
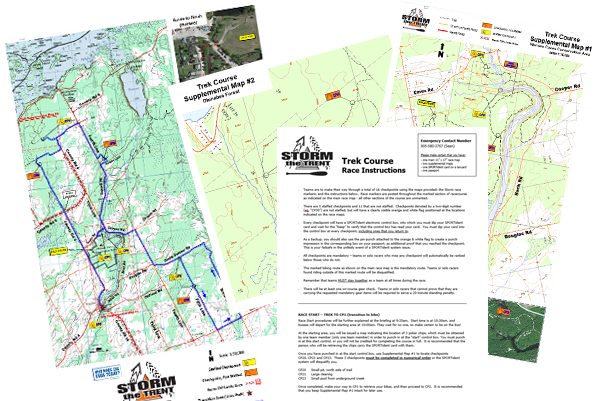
Your team kit that you will receive at Check-In typically includes:
- a main race map which outlines the course - a series of supplemental maps, which provide additional detail for specific sections - a set of written instructions outlining the flow and details of the racecourse - your timing card and race passport |
|
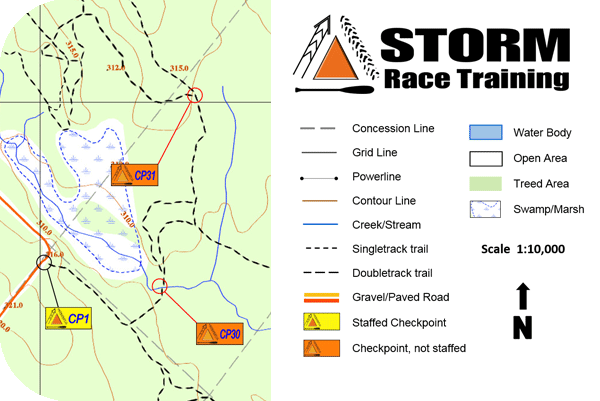
All maps provided are in topographic format, and are customized using our own fieldwork. What this means is that any trail data is completely up-to-date, so that what you see on the map matches what you see in front of you!
All race checkpoints, transition areas and marked race routes are pre-plotted on the maps. A legend is provided to identify singletrack vs doubletrack trail, different road types, or any out-of-bounds areas. |

|
The race instructions provide a comprehensive overview of each stage of the race, as well as written descriptions for each of the checkpoint locations.
These details are all very important, and will provide additional information not evident through the maps alone. They are used in conjuction with the maps to help guide you through the course. |
|
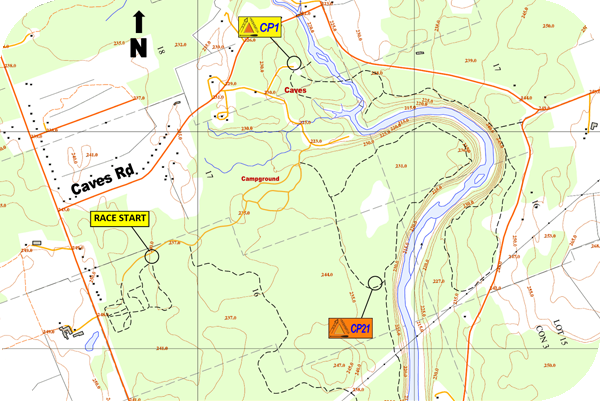
The racecourse is made up of a series of "checkpoints" (CPs) which teams are required to make their way through.
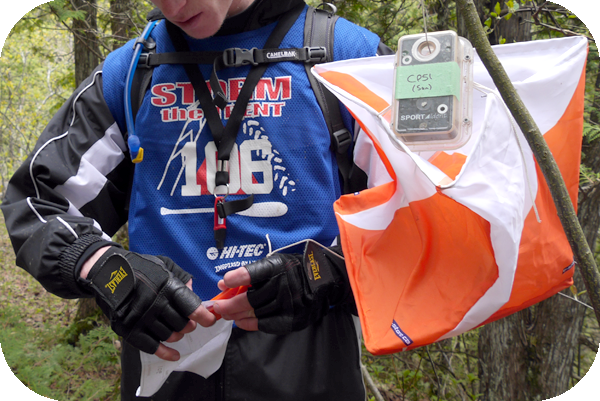
Some checkpoints are positioned along marked routes, while others are located within unmarked sections that must be found through use of the maps and instructions. Checkpoints are represented by orange & white orienteering flags, with a punch system attached. |
|
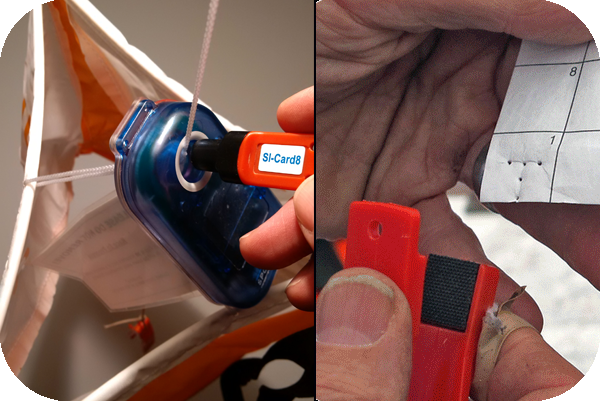
The punch system at each checkpoint is the means by which a team's progress through the course is verified. It is made up of two parts:
- a SPORTident electronic punch, which puts a digital imprint onto your timing card - a manual pin-punch, which is used to create an impression onto your race passport |
Tutorial #3 Scale & Measurements
click images to enlarge
|
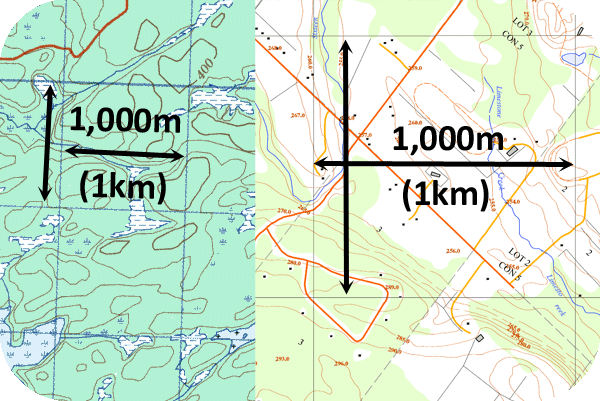
The race maps will have a grid pattern of thin lines overlaid onto the map data.
Unless specified otherwise, the space between the grid lines will represent 1,000m (1km) of distance on the ground. |
|
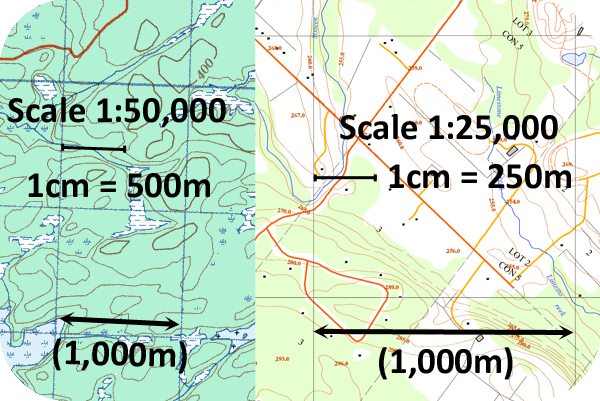
Maps may be issued in different scales. The scale of the map is represented by a ratio provided in the map's legend.
The ratio given is that between 1cm on the map, and the number of centimetres it equals on the ground. For example: - a 1:50,000 scale means that 1cm on that particular map = 50,000cm (or 500m) on the ground - a 1:25,000 scale means that 1cm on that particular map = 25,000cm (or 250m) on the ground |
|
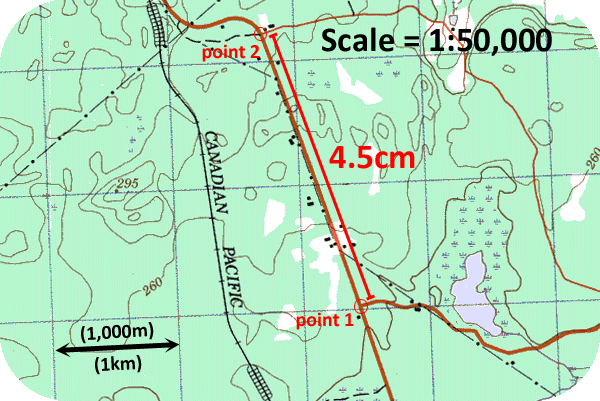
Armed with the map's scale and/or the distance represented by the map gridlines, you can determine rough estimates of distances between identifiable features. You can do this a couple of different ways:
METHOD A - simply eyeballing the distance: 1) the space between these two points is roughly equal to 2 and a quarter grids, so since gridlines are 1km apart, we know that we'll be travelling roughly 2.25km 2) the space between these two points looks to be about 4.5cm in length, so on this 1:50,000 map, we know that we'll be travelling roughly 2.25km (4.5 x 50,000 = 225,000cm or 2.25km) |
|
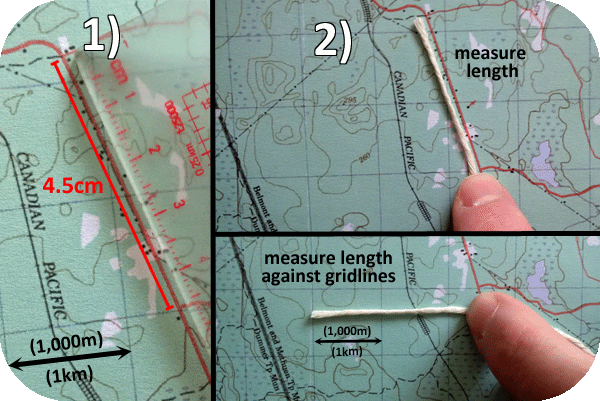
METHOD B - using a measuring tool to determine distance:
1) Use the ruler on the edge of a compass to measure the space between two points. If your compass doesn't have a ruler, you could use an object that is roughly 1cm (your baby finger?) to measure. 2) Use a piece of cord, which you could string along your planned route, and then measure the length of the cord used against the map's gridlines to get the approximate distance that length of cord represents. This is particularly handy when your planned route does not follow a straight line. |
Tutorial #4 Map Features
click images to enlarge
|
The race maps feature a legend that illustrates the various elements of the map data. These can help you identify land features as you pass through the racecourse, which in turn will help you keep tabs on your whereabouts on the map.
This legend will typically include the map's scale (as explained in Tutorial #3), as well as the orientation of the map (the direction of north). |
|
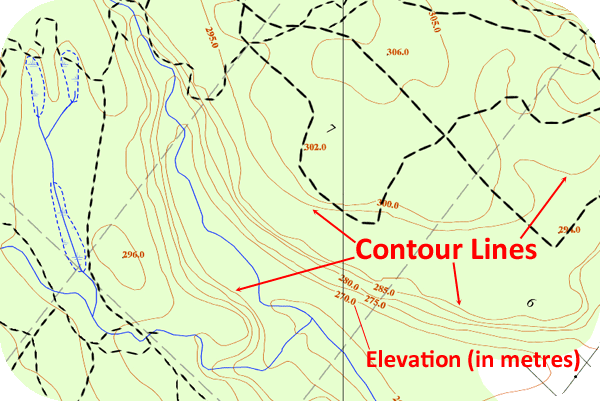
Elevation on a topographic map is represented by contour lines.
Imagine that the map was a 3D image, with all of the hills or other forms of elevation raised above the flat surface of the map. Then, imagine flattening that image with a rolling pin, so that it's now only 2-dimensional. The now-squished elevation on this 2D image is represented by the squiggly lines shown in the sample. These are contour lines. In this sample, the space between each contour line represents 5 metres of elevation change. |
|
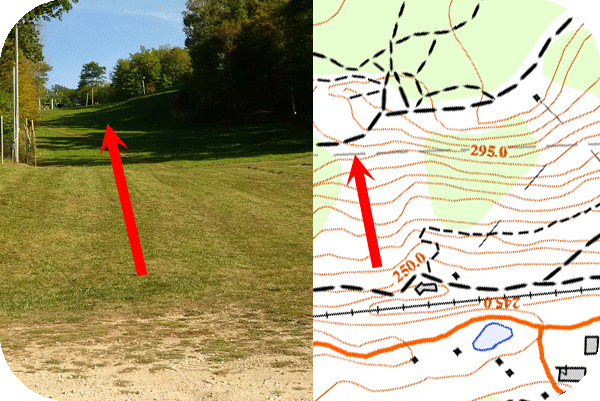
The space between each contour line in this sample also represents 5m of elevation change. Obviously the closer the lines are together, the steeper the elevation gain or loss.
If your planned route involves crossing a series of tightly-woven contour lines, you know that you will be either ascending or descending a steep hill. Like the other elements of the map data shown in the legend, contour lines can be very helpful in identifying land features. |
Tutorial #5 Using the Map
click images to enlarge
|
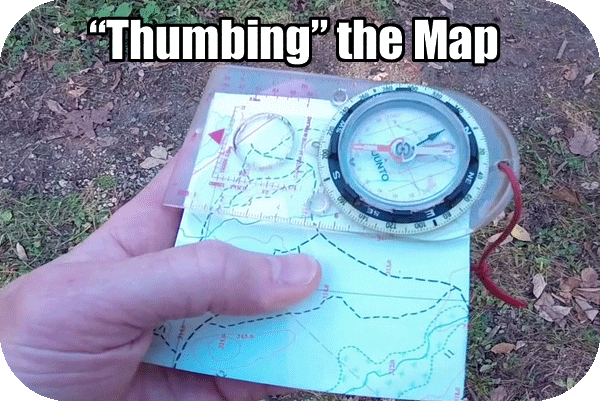
The most important rule of adventure race navigation is that you must always be following along with exactly where you are on the map.
When you don't know where you are on the map, you are in a sense "lost" in that you have no means of accurately determining how to get yourself back on track, or how to get to your next destination. In addition to keeping the map oriented, another helpful method of keeping tabs on your whereabouts is "thumbing" the map, or keeping the tip of your thumb in line with each known landmark or catching feature as you proceed along your path of travel. |
Tutorial #6 Gear Tips
click images to enlarge

|
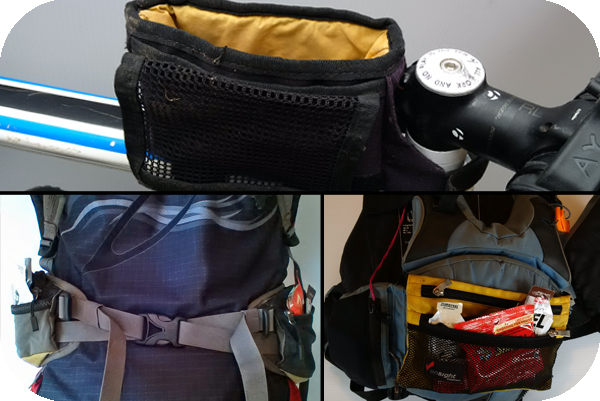
Adventure racing requires regular hydration, but it's often easy to forget about if you don't have water readily available at all times. Some common methods of keeping fluids at the ready include:
- a water bladder in your pack for throughout the race - creating a water bladder pouch for your PFD (some designs will have this already) - water bottle cages on your bike |
|
Adventure racing also involves burning a LOT of calories, but again, if you don't have food readily available, it can be easy to neglect your body's need for regular energy replenishment. Some methods of keeping your race fuel easily accessible include:
- choosing a pack with forward-facing waist pouches - devising clever ways to attach a food pouch to the front of your PFD - a top tube pouch for your bike (commonly referred to as a "bento box") |
|
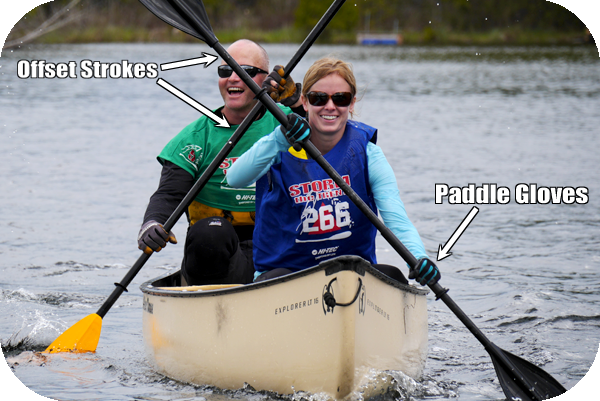
Use of kayak paddles in a canoe is permitted in adventure racing. Depending on your experience level in a canoe, a kayak paddle stroke tends to be a more natural technique, and can allow for greater efficiency between team members.
For beginner paddlers, it is recommended to use offset kayak paddle strokes (paddling on opposite sides of the boat on each stroke), to allow for greater balance. Paddle gloves can be very helpful, both in preventing blisters on your hands, and in keeping them warm if the weather is not favourable. Paddling is typically the weakest of all adventure race disciplines - try to get into a canoe before Race Day! |
|
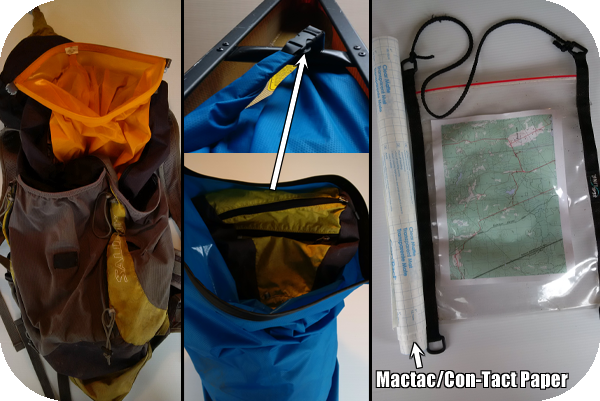
Having a dry bag inside of your race pack may be one of the best gear investments you can make, as keeping your spare clothing and mandatory gear dry is critically important for when you really need it.
A larger dry bag for your pack to go inside of can also be very handy during the paddle, so that you aren't left with a soaking wet and extra-heavy pack once you exit the water (packs almost always get wet during the paddle!) This external dry bag can also allow you to clip your pack to the canoe (so that you don't lose it or its contents if you accidentally tip!) Map bags are very important for keeping your maps dry. You can also use clear mactac paper to protect your maps. |
|
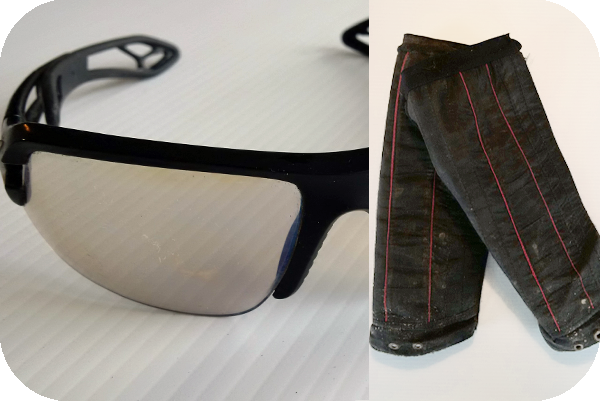
Wearing eyewear while on the bike is common in order to keep dirt and the spray from your tires from getting into your eyes.
Clear shades allow you to see more clearly while in the bush, and will protect your eyes from tree branches if you have to bushwhack. Another helpful piece of protection when crashing through the bush is either gators or shin guards. Nothing hurts worse in the forest than smacking your shin on a tree stump that you couldn't see! Long pants are usually recommended for trekking sections. |

|
Towing systems are sometimes used by experienced teams to allow stronger racers to give assistance to their teammates if they need it.
While on an open running section, teams might use a piece of surgical tubing with two carabiners connected between the pack of the lead runner and the waistbelt or check-strap of the trailing runner. For the bike, teams have been known to fashion towing systems from the lead rider's seatpost. However, the design has to be such that any cord used does not get caught in the bike's rear tire. Note that these are home-made inventions - you will not find anything like this at a retail store. IMPORTANT - it is not recommended that any such systems be used in a race unless they have been thoroughly tested in advance. |
|
|
|

|

|
|
|
|
Copyright Contour Adventures Inc.
All Rights Reserved
All Rights Reserved